


Sprinkler Mini-Makeover: Rotor Head
If you’re looking to mix it up a little with your sprinkler system this summer, a simple and fairly inexpensive place to start is by changing your sprinkler’s head. Rotor heads are a common choice when you first install sprinkler systems, and they may be the right choice for you now. These sprinkler heads, also known as gear-driven sprinklers, are ideal when it comes to watering large, open, and square areas of grass or plants. If you don’t have a rotor head, chances are you probably have a spray head instead. The easiest way to tell what kind of sprinkler head you currently have is to notice the movement. Spray heads are stationary and simply spray in one specific direction. Rotor heads, on the other hand, rotate and can be adjusted to change the width of their spray. Spray heads water the area faster, since they water a constant direction, while rotor heads are meant to cover more area. If by the end of this article you think you want to give rotor head sprinklers a shot, check out plumbersstock.com to find some great deals.
So we’ve
talked a little bit about the differences between rotor heads and spray heads,
but we haven’t really touched base on the advantages of a rotor head. As
mentioned above, rotor heads have the ability to rotate and can be adjusted in
spray width. This means that rotor sprinklers can cover and water a much larger
area of your lawn, garden, or field in addition to changing the rotation angle
anywhere form 5 degrees to a full 360 degrees. Most rotor head sprinkler can
spray up to 40 feet, with the average being around 25 feet. Rotor heads have
larger holes where the water exists than do spray heads, meaning there’s less
of a chance for it to clog. Because of the design of rotor heads, you have free
access to change anything from direction, width, distance, and stream of water
to best fit the area you’re watering.
Rotor heads are best used in areas that are downward sloping and have nonabsorbent soil types. They are best in these types of areas because of the low rate at which water flows from them. If a spray head were to be used in such an area, it could easily lead to overwatering and excess water run-off, which would waste money in the long run while potentially ruining the soil and area.
As far as disadvantages go, rotor heads require quite a bit more maintenance that do your spray heads. At the beginning of each season, it’s recommended to check your sprinkler heads to make sure they’re set up properly (facing the right direction, properly adjusted in width and distance, etc.) and nothing is clogging them. Rotor heads also require high water pressure, and this can be problematic if your area simply doesn’t supply this. Typically, you’ll find that commercial areas have higher water pressure, so check your residential neighborhood before buying and installing rotor sprinkler heads.
Sprinkler Valves and Filters
Today, it’s easy to have a lush, green lawn if you have a reliable automated sprinkler system. Your sprinkler system consists of three basic components: a timer, your sprinkler system, and sprinkler valves. When I comes to automated irrigation, your valves are the essential connection between the other two components. They are the unseen heroes of the sprinkler world, and today we’ll see why.
WHAT IS IT?
A sprinkler valve has one basic function: to control and regulate the water in your sprinkler system. You may have one central valve with only one control, or you may have this control many zones. Because they are used to regulate the amount of water your lawn gets, they are the main culprit to go to when you need to shut off water to your sprinklers. This makes valves incredibly useful when preparing your sprinkler system for winterization, and the use of a valve makes this tedious task a little easier. It may not seem important, but water left on during the winter can freeze and expand in the pipes, causing massive damage to your sprinkler system and the pipes connected to it.
There are two kinds of sprinkler valves: anti-siphon and in-line. ANTI-SIPHON valves allow for easy access for maintenance or, as mentioned earlier, if you need to shut off the water to your sprinkler system in a hurry. These valves come with something known as backflow prevention, which stops water that may be contaminated from re-entering the water system and being used for drinking water. Anti-siphon valves are typically made of PVC pipe, but they also come in brass and bronze varieties. When comparing the material types, remember that brass and bronze designs have a higher initial cost than PVC designs, but also tend to last longer than their PVC counterparts.
The second type of sprinkler valves s known as IN-LINE valves. These valves are installed below the ground and as such can be installed practically anywhere in your lawn without the valve poling up through the grass. In-line valves work much like the anti-siphon valves, but they don’t come with a built-in backflow preventer .If you wish to have a backflow preventer for these valves, you’ll need to purchase and install it separately. These valves are most commonly made of PVC pipe, but like the anti-siphon valves, may come n brass and bronze varieties as well.
Finally, if you have a valve, you’ll want a side filter to keep your sprinkler lines clean of incoming dirt and debris. Oftentimes, you can purchase your valve of choice in a bundle with a sprinkler filter. While valves are instrumental in controlling the flow of water, filters are necessary for preventing clogs in your system and keeping the flow of water optimal.
If you’re interested in browsing either the valves or filters online, start with plumbersstock.com.
Pipes and Pipe Fittings
Pipes control much of our passages for things such as air or liquid in our homes. As for a broad definition of pipe fittings, they can be categorized in three basic types of fittings: HVAC, plumbing, and sprinkler. With so many types in each category to choose from, it can be tricky and frustrating to figure out which pipe fitting you need for your project.
WHAT IS IT?
If you’re going to be working with pipe fittings for your project, it’s good to know a general definition of what a pipe fitting is. Basically, a pipe fitting is any part that connects piping or tubing. Fittings allow you to control and change the direction of your piping, split off new lines, and control the flow of fluids. There are quite a bit of different fittings, and the kind you need for your project will depend on what you’ll be transporting and where you’ll be transporting it. Keep in mind that all material types are unique and different from one another, and as such, each material should be used only for its respective purpose. If you’re searching for a specific pipe fitting and can’t find what you need at your local home improvement store, check out plumbersstock.com to save big on all the tools and materials you need.
• PVC – One of the most well-known and most widely used materials in plumbing, PVC pipe is made of a durable polyvinyl chloride. PVC piping is extremely unyielding and sturdy, as well as inexpensive, making up for its huge popularity. PVC piping is seen on virtually every sprinkler system, but it’s used for more than just outdoor plumbing. PVC pipe is also good for wiring projects, as the wires can easily be enclosed in PVC pipe to prevent electrical shortages and accidents.
• Black iron – This type of pipe fitting isn’t seen too often and is commonly used for heavy-duty purposes deep underground, such as the transportation of natural gas, propane, and water. Built to last and withstand plenty of cubic pressure per square inch, black iron fittings are durable and last for years.
• Galvanized – These fittings are specifically built to withstand corrosion. Made from galvanized steel, this pipe material is extremely tough and durable and allows the pipes to stand against harsh weather conditions for years.
• Copper – Copper pipes are meant to handle a variety of different applications, although they’re best known as being great insulators that prevent electrical shortages. Copper fittings are an ideal choice because they’re easy to install, lead-free, and can withstand corrosive elements.
• ABS – Not often seen, ABS pips are used in cold weather areas. They can withstand low temperatures and are especially useful if sub-freezing temperatures if you want to avoid cracks in your pipes.
• Polyethylene – Similar to PVC pipe, polyethylene fittings differ in that they’re barbed at the edges. Because of this, they don’t require glue or primer to connect. Additionally, they also tend to be more flexible than PVC pipe.
Comparison: Tank vs. Tankless Water Heaters
Everyone loves hot water. If you live in a developed country, it’s become clear that hot water is a common issue for builders and renovators. Why? Current homeowners are interested in homes that coincide with the “Green Movement”—that is, homes that are energy efficient and economically affordable. Since water heating is the third largest expense in a home, accounting for up to 25% of a home’s total expenses, homeowners today are looking for new ways to cut that price.
Today, the most energy-efficient option for a water heater is a TANKLESS water heater, also known as ON-DEMAND systems. Unlike a traditional tank system, which is constantly reheating a reservoir of water, tankless systems are only activated when you turn on a hot water faucet.
It seems simple enough, right? Well, although tankless heaters are the most energy efficient choice, this doesn’t mean they’re the most budget-friendly. They may be a good choice for your parents, but perhaps not for you. To help you figure out what water heating system is the best for you and your household, below I’ve made a short Pros and Cons list comparing tank and tankless systems. If you decide to browse through tankless systems, or if you just want to figure out prices, click on plumbersstock.com to browse a huge selection of propane, electric, and natural gas-fueled tankless systems at a low price.
TANK WATER HEATERS
PROS
· Proven technology – This is a straightforward system that we’ve been using for years. Professionals know it well and there are literally hundreds of repair manuals on how to fix these sorts of systems.
· Inexpensive cost and installation – If you’re looking to save a few dollars now, tank systems are the best way to go. New systems can usually be purchased for under $300, and installation is relatively simple, meaning low cost.
· Energy Star – Looking for a little more energy efficient? New Energy Star models are now available, raising energy efficiency to about 62%.
CONS
· Always on – Unfortunately, no matter how energy efficient the system is, the truth of the matter is it’s always on. Since the tank must constantly be reheating the water, you’re constantly using energy in the background.
· Not always enough – If you live in a home with teenagers, you’re probably used to cold showers. Just because you have a 50-gallon tank doesn’t mean it’s enough for the demand.
· Big and bulky – These systems are BIG. They require adequate space and are especially tricky to install in smaller places like apartments or condos.
· Low life expectancy – On average, these systems are meant to last 12 to 15 years.
TANKLESS WATER HEATERS
PROS
· Efficient – While the average energy efficiency for a tank water heater is about 67%, tankless heaters range from 80-98+%.
· Small – These systems are about the size of a small suitcase. Some are even small enough to fit underneath a sink or in a nearby cabinet.
· High life expectancy – On average, these systems can last 20+ years.
CONS
· EXPENSIVE – The biggest con is that these systems can be VERY expensive. Small electrical heaters can cost $500-700, while the pricier and bigger gas-fueled systems can cost $1,000-2,000. And that’s just retail price. If you go for a gas-fueled tankless system, you’ll have to add the hefty cost of installation. Considering you generally need a whole new ductwork and new gas lines, this price gets big fast!
Simply Modern - Fireplaces
Your home is a place where you can unleash your creativity in the most imaginative ways. You can arrange your furniture however you want it and no one will tell you otherwise. You can decorate to your heart’s content and no one will stop you. You can even draw on the walls without being reprimanded. With so much free reign on what you can do, there’s very few limits to what you can’t.
Today I want to focus on talking about modernizing your home while having a fireplace. In these cold January months, keeping warm is essential to living comfortably. Some of us may have wood burning stoves, others may rely on a central heating system, and others still like to use their fireplace to warm up their living areas. People often assume that having a fireplace means you have to revert to cramped and often unappealing living spaces, but that’s not true. Today I’ve pulled together a list of examples where fireplaces are used in ultra-modern design schemes to make your home look beautiful. Please keep in mind when looking at the following images and descriptions that we’re talking about GAS fireplaces here. If you’re interested in converting your clunky wood burning fireplace to a cleaner, gas-fueled fireplace, you may want to buy an insert from plumbersstock.com.

I was never really all that good at trigonometry, but I love it when shapes come together. In this instance, we’ll call it “Playing with Boxes.” You notice how all the boxes are stacked on top of each other in all sorts of different ways on the mantle? Well, that’s for more than just for looks; it actually adds a large amount of depth and perception to your living area. Keep in mind that some of these boxes double as shelves for your objects, so be creative.
Lines can tell you a lot about an image. Lines can help your eyes follow a path or point to a particular subject. If you want to emphasize your fireplace, arrange your furniture in such a way that it’ll point it out. If you to add an extra spark to your living area, try mixing some dark wood tones and white or beige furniture into the mix.

If you really want something to stand out, you frame it. Isn’t that what we as humans do? We frame images of our loved ones, special moments, and great triumphs to celebrate them. The same thing goes with your fireplace. If you want to emphasize it, frame it. Now, obviously the traditional method won’t work for this, so you’ll need to go for something bigger, say wood paneling. Arrange your furniture around it (beige and white furniture will show the greatest contrast) and add the finishing touch by adding throws, quilts, and pillows in mixed orange and brown colors. Since orange and brown represent the Fall season, this will make your living room appear warm and cozy to your guests.
Simply Beautiful - A small DIY project with a rug
Have you ever wanted to do something totally cool, totally customizable, but not known what to do? There are a million DIY ideas out there already, and I’m going to add another one right now.
During the holidays, I was inspired. I walked into my friend’s home and saw this beautiful purple and white rug in their living room. It looked new, so I asked them where they bought it. “We didn’t,” they answered. “We MADE it.”
I was totally blown aghast and the first thing I could think of was, “Well how did you make the rug?” They laughed and told me that wasn’t what they meant. Then they went to on explain exactly what had happened. So Debra, the wife, had wanted a new rug for ages. Her old one was crumbly and stained and just drowning with fur from their pets, and she was sick of it. As a Christmas present, her husband had seen a DIY video online of decorating a rug. He bought the necessary supplies and went to work on it. The result? A BEAUTIFUL purple rug with a giant periwinkle lion in the center of it.
I had no idea this was possible, and it did in fact turn out VERY GOOD (you can’t even tell it isn't store bought), so I’m excited today to share this fun weekend project with you. Here’s what you need:
• Any colored rug, any size.
• A stencil of your choice.
• An acrylic paint of your choice.
• Painting supplies (I recommend a foam roller and a paint tray).
From here, it’s pretty easy. Place the stencil down on your rug and pour the acrylic paint into the paint tray. Using your foam paint roller, roll into the paint and then slowly press into the stencil. Be sure to do it at a fairly rapid pace, since acrylic tends to dry quickly.
Before you know it, you’ll have a decorated and beautiful looking rug! For more info on this, check out the following site: http://www.pinterest.com/pin/103653228896419266/. Have fun!
Sloan Valves - For the small business owner
Today, we’re going to talk about the one phrase that gives everyone the chills: public restrooms. I can’t speak for anyone else, but at least for myself, I try to avoid public restrooms as much as possible during my outings. The thought of hundreds of strangers sharing the same toilet as me, sitting where I’m sitting and doing their business makes me feel entirely uncomfortable.
Still, today’s topic isn’t about public restrooms as much as it’s about public restroom hygiene. Today’s article is dedicated to all those local and small business owners who have public restrooms in their facility. It may be a restaurant or a local office building—whatever it is, if you must keep and maintain a public restroom, this article will be to your benefit.
Most public restrooms have toilets with flush valves the user must push in order for the toilet to flush. Some fancier restrooms may have motion-sense toilets which flush automatically when the user is done. I personally prefer the flush valve over the motion-sense toilet myself, because I’ve been in that awkward situation where the toilet flushes before you’re done. Commercial flush valves use pressure instead of gravity to flush, but buying a cheap flush valve for your toilet means replacing it often. To avoid that unnecessary expense, it’s a good idea to think about flush valves which are durable, heavy-duty, and reliable.
If you haven’t already researched them, you should consider Sloan. Sloan is a leading innovator in commercial flushing technology, so it’s no wonder that their products are ranked among the most dependable and trustworthy on the market today. Sloan offers plenty of different types of commercial flush valves, from automatic flush valves to urinal flush valves.
Unlike a lot of other big-name companies out there, Sloan hasn’t restricted themselves to simply being a leader in the toilet and urinal department. Among their range of products you’ll find things like soap dispensers, refill soaps, valve parts, and urinal screens. You’ll also find wall-mounted urinals and bowls that are built with the same precision and durability as any other one of their products. One of their best-selling products is their waterless urinal, which is a fantastic way to conserve water while staying hygienic.
Speaking about conserving water, you might be wondering what differentiates Sloan from any other commercial toilet and urinal manufacturer on the market today. Sloan believes in using water efficiently to take care of our Earth’s most precious natural resource (sloanvalve.com). Because of this mindset, the company makes an effort to be as green as possible. Starting with their flushometer in 1906, they strive to deliver great water efficiency while reducing the cost of ownership for their products. Today, they use dual-flush flushometers and fixtures in their “Efficiency Series” and continue to research more ways to broaden their products water conservation ability. Because of this, Sloan is indeed one of the “Greener” companies when it comes to commercial toilets and urinal products and accessories, a major plus considering how much water a single toilet can waste during its flush.
If you think you might be interested in learning more about Sloan or maybe even replacing your business’ toilets, urinals, faucets, or flush valves, find out more information by clicking on Plumbersstock.com here.
A Simple Review on a Toto Toilet
Today I’ve convinced my grandfather to give a quick review on his Toto toilet. He’s got plenty to say about it, but he’s not exactly computer savvy, so before you read, keep in mind that this is an honest review from an older gentleman. He’s never done a review before, so if he misses out on certain details or fails to answer some questions you may have about purchasing a Toto toilet, bear with him.
His Toto toilet is about a decade old, I think, but it is still in fantastic condition (although the bowl has a permanent yellow stain around the water’s edge) and as far as performance, though it’s an older model before the 1.6 gallons per flush rate, it tends to flush everything quickly and efficiently, if not loudly.
Without further delay, here is the review on a Toto toilet (this was just a short intro into his writing)!
"I have a good toilet. My granddaughter said it would be a good idea to share my ‘personal experiences’ and tell people what I think about my wife’s and mine toilet.
She tells me it’s a TOTO toilet, and I’m not sure what that means, but all I know is that the dadgum toilet is STRONG. I mean, it’s like Grr! The thing will just about suck your buttocks off every time you flush it. It’s loud too. I like to call it THE MONSTER. The toilet works really well, even though my wife and I have had it for over 10 years. It doesn’t clog.
I mean it literally DOES NOT clog. I know, I’ve tried. The thing is so potent and strong, it flushes everything you throw at it the first time. We’ve had our toilet since we bought the house and it’s never given us any problems.
It’s a really nice toilet, it’s a nice white color and except for that ugly yellow stain in the bowl, it’s in good condition. That yellow stain, it’s like EWW! It’s gross and nasty, and it just sits there, like it’s watching you. It’s gross but unfortunately, that’s just the way it is. It just won’t come off.
If you need a strong toilet, you should think about getting one like my wife and I have. It’s loud and powerful, but it gets the job done.”
Since Toto created the toilet my grandparents are using, it’s come a long way. Their newer models say they’re just as capable of flushing anything and everything, but they’re quieter and come with antimicrobial surfaces to stop something like a stain around the water’s rim from happening.
If you’re looking for a new toilet, consider a Toto before you buy.
As a bonus, if you're looking for a new toilet but aren't sure where to buy, check out plumbersstock.com for some good deals on Toto products.
Tankless Water Heaters: Why You Want One
Tankless water heaters can be a fantastic investment if you’re living with a big family. Hello everyone, and thanks for stopping by! Today, I’ll be doing a quick review on my tankless water heater by Rinnai.
Do you waste your supply of hot water quickly? This is most noticeable in the shower, when all of a sudden your water goes from perfect temperature to just a little chilly. If you find yourself in need of a few gallons of extra hot water, going tankless might be your best option.
Tankless water heaters work in slightly different ways than your basic tank-style heater. A tank-style heater collects water in its storage tank, then periodically warms it up throughout the day so that whenever you use it, it’s nice and hot. This way, although common, is anything but practical if you know your hot water usage is high. A tankless water heater, on the other hand, heats water as you’re using it. This means you get a limitless supply of hot water while saving money on your utility bills, since you’re not wasting gas reheating a tank of water.
Tankless water heaters are perfect for doing multiple things at once since the supply of hot water never runs out. This means you can be washing your dog while someone showers, someone washes dishes, and someone does laundry, all at the same time. These kind of systems are perfect for people on the go, since you never have to stop and wait.
Tankless heaters can come in a variety of different sizes, but since you don’t have a storage tank, they’ll be smaller than a lot of other water heaters. Rinnai heaters are great to be placed inside or out, meaning you have more space when you need it.
The downside to all of this is that tankless heaters are generally much more expensive to buy up-front. Installation isn’t too bad, but you’ve got to be willing to drop anywhere from $1,000 and up if you want a good tankless heater. Rinnai heaters are worth the investment, as they’re covered by a 12 year warranty and have a longer lifespan than other heaters.
If I had to choose all over again, I can guarantee that I’d choose to buy Rinnai. Their customer service is incredible and their product does exactly what it’s meant to, no strings attached. On top of that, we waste less gas, so we end up saving money every month on our utility bills. Overall, it’s a win-win situation.
If you’re looking to buy a tankless water heater to replace your prehistoric heater, I encourage you to check out Rinnai before you buy. If you can’t afford their products at the moment but you’re desperate for a new water heater, don’t despair. This site should offer some good help to you, as they specialize in all things plumbing, including water heaters. Remember to do your research before buying—check reviews, prices, and features!
Have a great time finding your new tankless water buddy!
Grundfos Pumps - What Use Are They?
I have a friend who works in the agricultural business, and recently I decided to go out and visit her and her husband on their farm. They own a large, spacious, beautiful 300 acre plot of land where they grow plenty of berries, pears, potatoes, wheat, and onions. I hadn’t visited them in a while, so I was excited to step out of the stuffy and overcrowded city and get some nice, fresh air out in the open.
When I arrived, we talked for a while about basic topics like what I had been up to, and how their life had been since the last time I visited them. Then, my friend took me on the tour of their farm (well, it was a bit more of a quick overview) so I could see how the crops were doing.
Throughout the tour, I noticed that the crops looked beautifully healthy and well-maintained, but I wasn’t sure if it was just fertilizer, the weather, or the irrigation system. When we got back to their home, I asked her about that and to no one’s surprise, she said it was a combination of good weather, high-quality fertilizer, and their irrigation system. Well, being the plumbing-curious woman that I am, I decided to ask her more details on their irrigation system. Here’s what I found out:
The irrigation system that they use is powered by a number of tubes and pipes, as well as motors and pumps. What really interested me were the pumps they were using, as I figured it had potential for me to write about them later in my blog.
I found out that the pumps that fueled their irrigation system were from a company called Grundfos. Now, I wasn’t at all familiar with the company, so when I got back home, I decided to look them up. I discovered that Grundfos ranks among the top manufacturers for pumps in the world and is an industry leader when it comes to state-of-the-art hydraulic innovations and energy-saving products. Their products are made from high-grade stainless steel which resists corrosion and they’re also incredibly energy efficient, albeit expensive.
Grundfos pumps have the ability to save you huge amounts of money on your energy bill because of their energy efficient performance, but what I really loved was the fact that the company had been around for over 60 years. These important characteristics made them reliable and trustworthy as a company, and after witnessing their products in action, I can confidently say that their pumps live up to what they boast.
If you have a farm or know someone who has a farm, definitely consider reworking your irrigation system to hold Grundfos pumps. Even if you’re not a farmer but have a small flower or herb garden, Grundfos pumps come in a variety of sizes and voltages to give you the exact level of performance you’re looking for.
To help you get a bit of a better idea of what pumps can do, I've listed two other short articles which talk about using Grundfos pumps in other circumstances.
Article 1: Wells and Pumps: http://emilyfields.blog.com/2013/09/19/harnessing-natures-power-to-get-water/
Article 2: Ponds and Pumps:
| http://missplumbingguides.blogspot.com/2013/09/a-beautiful-pond.html |
Power Tools - A Brief History Lesson
Hello again my loyal blog readers,
Today we’re going to be talking about something a little out of the ordinary, but don’t fret, it’s not a tough subject.
We all think of plumbing as having to do with toilets and faucets and cool stuff like that, but do you ever stop to think about all the little toys and trinkets that let us do plumbing right? Like, for instance, screwdrivers or wrenches, which are super handy when we’re working to replace a faucet or fix a leaky or dripping faucet. Or, what about power tools, which aid us in installing and removing BIG fixtures, like stand-alone sinks, shower components, or even toilets?
We never really think about these sorts of things, but we use these tools all the time. Because of their importance in plumbing, I thought I would take time today to talk about power tools, specifically, Milwaukee tools. If any of you are familiar with power tools, you’ll probably recognize the names DeWalt, Black & Decker, Bosch, Milwaukee, and Snap-On tools. While all these brands work to achieve the same basic goal, my favorite by far is Milwaukee due to their constant improvements in technology and energy-saving practices.
Today, I’ll be talking about Milwaukee’s history and why you should consider replacing your power tools with Milwaukee brand.
It began near the end of World War 1, with a man named Henry Ford. As I’m sure you’re all aware, Ford is best known as the inventor of the assembly line for automobiles, which sped up the process in which a company could produce a car. Ford approached a man named A.H. Petersen, who had been producing tools for the company for a few years, with a request to have him produce a smaller, lighter, portable ¼” capacity power drill.
In 1922, A.F. Siebert joined Petersen and formed the A.H. Pertersen Company. In 1924, the company was bought out in an action and thus began the Milwaukee Electric Tool Corp.
At first, Milwaukee kept its business by repairing tools that were already on the market. As they did this, they kept a tab on what the customer was looking for in a tool and thought up ways to offer what the customer wanted at an affordable price while still making a profit. Eventually, Milwaukee started its first tool line with a customized motor that improved overload capacity, increased performance, and lowered overall maintenance to provide a longer tool life.
They began to generate positive reviews from their customers and continued making improvement to their tools. In World War 2, the high use of portable power tools in the armed forced marked the biggest turnaround for the business, and many new tools were added to their lineup.
If we fast forward to today, Milwaukee has grown exponentially since they first began. The company is now a world-leader and is one of the most looked-at companies for setting high industry standards for safety, innovation, and energy efficiency.
If you’re interested in learning more about Milwaukee and their newest lines of tools on the market today, check out the following URL for information on their latest and greatest: their FUEL line.
URL: http://missplumbingguides.blogspot.com/2013/09/fuel-your-desire-for-power-tools.html
The Knight to the Rescue!
I don’t know about you folks out there, but it’s certainly getting colder by the day! If you live in Utah (where I’m originally from and currently visiting), you’ll know what I’m talking about when I say Utah only has 2 seasons: winter and construction. While this is especially true for Northern Utah, I suppose it can apply to other states.
But, especially because it’s a weekend, who doesn’t want to come home to a nice, heated home and relax after a long and tedious week of work? If you have a good heating system, you can do just that. If not, you may need a couple of extra blankets to wrap yourself up in. If your position is the latter, maybe because your furnace burned out or your boiler just doesn’t heat up the way it used to, it sounds like it’s time for a new heating system.
You always have the choice between a forced air heating system and a boiler heating system, and while these two types of heating systems have their own individual pros and cons, today we’ll only be discussing the boiler heating system.
If you’re familiar with how a boiler works, this will be a quick recap. Boilers work to heat your home by heating water and then transporting it through the home in a series of tubes. Between this and a forced air system, boilers are unique as they can heat up single rooms at a time instead of the whole house, which is especially convenient if you’re going to spend most of your time in the one room.
If it’s time to get your heating system replaced, now’s the best time to do it before the cold really kicks in. Consider a Lochinvar Knight heating boiler for your home if you haven’t already.
Lochinvar is a world leader in the boiler industry and offers plenty of different kinds of boilers for your home and budget. Being a leader in the industry for over 3 generations, Lochinvar has continually shown their commitment to innovation and energy efficient machinery by applying the most advanced technologies to each new Knight boiler in the lineup.
The Knight offers up to 98% thermal efficiency, meaning you can have peace of mind that heating your home won’t cost you an arm and a leg this Christmas season. The Knight also offers a smart system operating panel which tells you all the different heating zone temperatures and information you need to know, right on the screen. This family of boilers comes equipped with combustion air, specific venting technologies, and a precise heating control which is meant to keep your home green and eco-friendly without sacrificing the warmth.
When we look under the hood, the Knight becomes more than just pretty piece of machinery. The Knight is a fully condensing modulating boiler, meaning it uses a state-of-the-art electronic control to optimize the energy efficiency for your home while smoothly regulating the temperature of your home through the seasons.
The truth is, winter is approaching fast and either your home will be aglow in warmth, or it won’t. If you’re looking to replace your heating system and think that a boiler would be a great match for your home’s lifestyle, make sure you check out www.plumbersstock.com for some great deals this Christmas season.
Until we meet again!
Programming your Thermostat to Cut Costs.
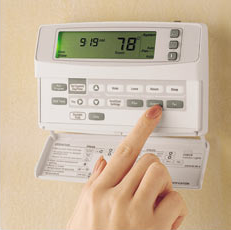
Prices on things like oil, electricity, and natural gas are changing every day along with the economy. Today, it requires a lot of energy to raise or lower the temperature in your home, even by just a few degrees. As the cold season approaches, some of you may be weary of relying on your thermostat to heat your home.
Today I want to say that you don’t need to be weary. A good thermostat, specifically a PROGRAMMABLE thermostat, can be used in alliance with your heating system to slash your home heating bill this winter season. Controlling your heating costs doesn’t have to be a chance game of Roulette. If you learn how to properly use your digital, programmable thermostat, cutting your heating bill will be a piece of cake!
Let’s start
with the bad. Most people use their thermostats by turning up or turning down
the temperature whenever they want their home hotter or colder. Some people leave
their thermostats on when they leave so their home will be the right
temperature when they return. And still others keep their heaters working
through the night so that their home will be warm when they wake up 8 hours
later. All of these scenarios are incredibly inefficient ways to control and
regulate your temperature and you’ll notice these raise your heating bill very
rapidly.
To start off, if you don’t already have a programmable thermostat, you’ll have to invest in buying one, but how much that will be depends on your budget. Keep in mind that this thermostat will pay for itself in heating cooling savings in either a year or less if you use it properly.
The next thing you’ll want to do is take some time to write down a weekly schedule. Since most programmable thermostats come with a 7-day programmable feature, your heating and cooling schedule can vary from one day to the next. On your weekly schedule, make sure you include times people wake up, times people depart and return to the house, and any empty blocks of time where no one is home. Once you’ve got your weekly schedule ready, follow these guidelines to get the most out of your heater this Christmas season!
- Program the thermostat to automatically shut off
the heater when you leave for work or school and turn it back on 30 minutes
before you’re due to return home.
- Program the thermostat to reduce the temperature
an hour or two before you go to bed. Once you’re asleep, you won’t require as
much heat to be comfortable. For example, if your thermostat is running at 75
degrees F, having it set to reduce the temperature to 70 degrees F an hour
before you go to bed will save you a lot on energy costs.
- Program your thermostat to start up 20 minutes
before you wake up so you can wake up to a warm house.
- If you’re planning on leaving town, make sure you either turn off the thermostat or reduce the temperature throughout the day. While shutting it off is the best option, if you have pets that are staying behind, make sure you provide a comfortable climate for them.
If you want to look at some great programmable thermostats, click on the following URL to discover the top programmable thermostats currently on the market: http://aplumbersdaughter.wordpress.com/2013/10/13/what-does-the-fox-thermostat-say/.
Stay Warm without a Heater This Winter
Have you been stressing about the upcoming winter season? While the Christmas season usually brings the thought of food, family, and merriment, it may also spark the uncomfortable memory of high heating costs.
This is no joke. With prices on gas rising by the day, it’s not extreme to want to find other ways to heat your home that don’t include a new thermostat or boiler.
If that’s the case, this mini-article is for you, as I’ve made a small list of a couple of good ways to keep your home warm without having to touch your current heating system.
Keep in mind, there is a difference between keeping YOURSELF warm and keeping YOUR HOME warm, but in this list, I’ll merge the two.
- To keep yourself warm, consider the following tips:
o Dress warmly, wearing thick clothes
o Dress in layers
o Drink hot fluids, such as coffee, hot chocolate, soups, or broth
o Snuggle with a family member or pet
o Use a hot water bottle to heat yourself up at night
- To keep your home warm, try these tricks:
o Cook often! Using your oven produces hot, dry air which heats quickly. Avoid cooking things that cause a lot of water evaporation, as humidity makes it harder to keep the area warm.
o Make sure your home is sealed from outside. Open your windows if the weather is nice, but during the night, seal them with a removable caulk as necessary if you have any leaks.
For now, I’ll leave it at that, but if you’re looking for more guidelines to help keep you warm this winter season, the following link might be helpful: http://www.thesimpledollar.com/ten-tricks-for-staying-warm-this-winter-without-huge-energy-bills/.
Adjusting your Rain Bird Sprinkler System
I’ve been focusing a lot lately on the folks who will be getting hit with heavy snowfall this year. There are a number of folks out there, I realize, who won’t be getting pummeled with frost and snow storms, and for you, I say congratulations. Though the weather will get colder, you’ll still be able to keep on watering your lawn and fruit trees without fear that they will get frostbitten. For you folks, I dedicate this article.
Every so often, you’ll need to adjust your sprinkler head. Sometimes it may seem like your sprinkler head has gone out of alignment for no reason whatsoever. The next time your sprinklers turn on, take a look: are they spraying the road? The sidewalk? The driveway? Your neighbor? Your dog? If they are, it’s time for a quick adjustment. With the right tools, you can do this yourself and save yourself an average of $50 by not calling your local water and irrigation company.
To fix your misaligned sprinklers, you’ll need to have the right tool, which can be found in most handymen’s toolbox: a flat-head screwdriver. Before you go out and start adjusting your sprinkler head, however, you’ll want to make sure that the sprinkler head and make sure there is no visible damage. If there isn’t, pick the issue that sounds closest to yours and follow the directions below and adjust your sprinkler head. If you’re not sure what to fix, try all three. Keep in mind that the directions I’ve provided for you below are meant to work for Rain Bird sprinklers, but they may work on other brands of sprinklers as well.
· To adjust the sprinkler’s radius or spraying distance – Above the spray opening you’ll see a radius-adjustment screw. Turn the screw using your flat-head: clockwise to reduce the radius, counterclockwise to increase it.
· To adjust the sprinkler’s arc –. Insert your flat-head into the arc-adjustment slot found on top of the head. You will see a small + and – symbol next to it. Turn the screwdriver clockwise to increase the arc, counterclockwise to decrease it.
· Replace the sprinkler’s nozzle – some Rain Bird sprinklers allow you to replace the nozzle to create changes to the distance or spray angle of the water. To replace your nozzle, turn the radius-adjustment screw counterclockwise to disengage it. Lift the sprinkler’s stem using the pull-up slot. Insert your flat-head underneath the nozzle removal tab. Using firm pressure, press the handle down to remove the nozzle. Insert your new nozzle into the open socket and turn the radius-adjustment screw clockwise to anchor it in place. Place the nozzle’s identification plug (this lets your controller identify where the sprinkler is and what its job in the cycle is) back into the opening on top of the sprinkler.
If you’re looking for more information on Rain Bird sprinkler systems, make sure you take a look at missplumbingguide’s blog.
Pellet vs. Wood Burning Stoves
With heating costs rising ever higher this winter season, you may be considering finding a supplement to your main heating system. You may be thinking a fireplace, wood burning stove, or pellet stove might be a good investment to make. Today I’m going to compare pellet stoves against wood burning stoves. I’ll omit fireplaces in this article for a few reasons:
- Most homes already have one, so you wouldn’t be considering buying one
- Their heating efficiency is quite low when compared to the other two
- They offer less perks in comparison (wood burning stoves offer cooking surfaces; pellet stoves offer higher overall efficiency than the two)
We’ll go ahead and start with comparing the heating performance of pellet stoves and wood burning stoves. A pellet stove is, in most cases, more efficient overall when compared to a wood burning stove. The reason for this is that pellet stoves are generally more airtight with more layers of internal insulation to keep the heat in longer and disperse it throughout the room more evenly. They can also be controlled with a thermostat as they run on electricity. A wood burning stove, on the other hand, tends to provide a “blast burn” effect, meaning that it gets very hot very fast. With internal temperatures reaching well over 1,000 degrees, you’ll feel the room heat up within a few minutes. Wood burning stoves do not rely on electricity, so they cannot be controlled with a thermostat. They only rely on wood and must be constantly fed to keep a constant heat.
As far as
installation costs are concerned, wood burning stoves and pellet stoves are in
the same range. The differences come during the installation of the accessory
items. Wood stoves require a capped, fully insulated, and often vertical
chimney to vent smoke, while pellet stoves only need a direct-vent system or a
smaller chimney set.
If we switch over to the operating costs of both, we’ll see that pellet stoves can only burn pellets, whereas wood burning stoves can burn firewood and wood scraps. In general, 3 tons of pellets will cost about the same as a winter’s supply of firewood, so costs are roughly the same for fuel supply.
In rare cases of emergencies, wood burning stoves are often held to a higher regard. The reason for this is that since wood burning stoves don’t rely on electricity, in case of a power outage, you still have warmth, light, and even a cooking surface. Pellet stoves, on the other hand, shut down in blackouts, since they do rely on electricity to run. If your area is susceptible to constant power outages, this may be a strong consideration to take into account before deciding which stove to buy.
Finally, if firewood is readily available or you have a way of obtaining free firewood (for instance, if you live in a heavily forested area you may choose to gather scrap wood), a wood burning stove may be the best choice for you. If you can handle the heavier pellet bags and have dry storage for them, as well as would prefer a thermostat controlled heat, you may instead choose the pellet stove.
Personally, I’m biased and prefer wood burning stoves over pellet stoves because of their cooking stove in emergencies, so I’ll provide you with the following link: If you would like to learn more about wood burning stoves, visit missplumbingguides’ article on why wood burning stoves are the better economical choice for you and your household.

Building a Deck the Easy Way
The winter season is upon us! Many of us have already received their first snowfall, and if you’re one of those people, I hope you like the snow! If you happen to live in an area where you don’t get much snow, you may be interested in pursuing a weekend project, just for kicks and giggles.
The project I’ll be going over today is how to build a nice, floating deck in your backyard. A floating deck is one that isn’t attached to your home, and this is nice if you’re looking for a space with a little more privacy that’s hidden somewhere else in your backyard.
I’m simplifying the process and cutting the costs. While a regular deck may cost anywhere from $5,000+, the deck I’ll be outlining today will be just over $2,000. For this project, you’ll need a circular saw and drill. Keep in mind when you’re building that if your deck is higher than 30 in. off the ground, you’ll need to obtain a building permit and railings. If you plan on digging footings, make sure you call 811 first to check for underground utilities.
Step One: Lay a simple foundation by setting concrete blocks on gravel. Level the high to low spots using a line level. To do this, attach a mason string between the high and low spot stakes and hang a line level, adjusting it until it’s balanced. Take diagonal measurements and tap the beams until they’re square. Placing temporary stretchers will help keep your beams parallel. Finally, finish this step by screwing on angle brackets at each joist location.
Step Two: Install middle and end joists. Screw on rim joists using clamps to hold them in place. Add corner blocking between the last two joists and nail the rim joist from both directions. This will give your corners additional strength and prevent them from falling apart.
Step Three: Build the frame and add steps leading up to the frame. Adding a step for every 8 inches is a good rule of thumb to follow as you build the steps. Start attaching your boards to the deck. When you’re done, screw on the skirt board to hide all the framework beneath the boards. Do the same to the steps.
Step Four: Gloss over your boards with a clear-coat spray to ensure they stay lustrous. If possible, find a weather-protection/clear-coat combo at your local hardware store. If not, apply the weather protection spray after the clear coat dries to provide protection against the elements.
That’ll do it. When you’re done, decorate your new deck by adding tables, chairs, plants, and any other decoration you want to it. Enjoy your new deck!
If you need additional guidance for any one of the steps listed above, you can find the original article by clicking on the image above.
Air Humidifiers - A Review
Christmas is a time of giving, a time of sharing and warmth and love. But what if you’re getting more than you bargained for? If the holiday season at your home means chapped, dry lips, itchy, dry skin, constant coughing or sneezing, or static buildup, you have a problem with the humidity in your home.
Low humidity isn’t a topic we see discussed often, and as such is filled with wrong interpretations and common misconceptions. Generally, when we think of humidity, we think of mold and mildew growing in places it shouldn’t in our home. While this is a correct interpretation, it’s only one interpretation. Did you know, for instance, that having too dry a home (that is, no humidity) can damage your home in ways that are just as bad as mold and mildew growth?
Having too dry a home can actually deteriorate your home. If you have any wooden floorboards, a dry atmosphere can slowly start ripping your floorboard apart at the seams as the floorboards constrict due to the lack of humidity. Wallpaper will start peeling at the edges when exposed to a constant lack of humidity. In this way, having too dry a home can be just as bad as having too moist a home.
Ideally, the perfect internal moisture level for your home lies at 35-40% humidity. But how can you get these levels? You can do your best to raise humidity by boiling pots of water, spraying your cloth curtains with water, or a bunch of other little tricks, but the best way to get your humidity levels at the ideal level is to buy an air humidifier.
I myself own an air humidifier and I tend to turn it on during the night for my kids (they wake up with crusted noses and eyes otherwise). Researching into this topic, though, I realized that I should have my humidifier on all day at low levels so I’m always hitting that peak 35-40%. I own a Honeywell Humidifier, and I have for as long as I can remember. My specific unit runs alongside my furnace to replace the moisture that’s sucked out by the warm, dry air.
My home’s personal humidifier is exactly what my family needs. From the day my husband first installed it, all we had to do was set it and forget about it. Every so often, I’ll wander down and check the reading on the humidistat (like a thermostat, but it tells the humidity instead of the temperature) to make sure it’s not too high, but other than that, it works by itself.
Since learning about the peak levels of humidity, I’ve started turning my humidifier on during the whole day. I’ve only had the chance to try this for one day, but I feel the results will be good for my home and my family based on what I’ve seen and read about.
If you’re thinking about investing in a humidifying unit, I strongly recommend Honeywell. It’s efficient, quiet, easy to set up and it gets the job done. I wouldn’t own anything else.
For more info on this sort of topic, check out missplumbingguides.blogspot.com’s article on air humidifiers by clicking here.
Installing an AC System
Installing things isn’t always an easy thing to do, but it can be very rewarding once you finish. For instance, installing your own radio in your car may sound tricky, but when you’re done you’ll be gifted with two facts: first, that you installed it yourself by the sweat of your brow, and second that you can now listen to all your favorite songs.
In a similar way, installing an AC system in your home can not only bring you immense satisfaction, but it can also bring you comfort and luxury as you soak in the delicious cool air. In the midst of winter, this may not sound like much fun, but you’ll definitely want this feeling when summer rolls around.
Below, I’ve outline the few basic steps you need to complete to install your split system AC. I won’t go into explicit detail, but I’m hoping I’m covering everything well enough that you’ll be able to understand what to do and how to do it.
To start with, the first thing you’ll want to do is select a location on the interior of your home. This will be for the indoor unit. Pick a location that’s unobstructed and make sure the wall is sturdy enough to support the weight of the mounting plate + the indoor AC unit. Try and avoid areas with direct sunlight or heat sources, as well as areas where you may suspect a gas or oil leak.
Once you have a location, secure the mounting plate to the wall. When that’s done, drill a hole in the wall to create an opening for the piping. The pipe will run downward to the outdoor AC unit, so make sure the hole is big enough that you can easily add a layer of insulation without making it a tight squeeze.
Check all the electrical connections on the indoor unit, make sure it’s properly set up, and connect the pipes to the outdoor unit. Minimize bending if possible to ensure best performance. End the setup for the indoor unit by securing the unit to the mounting plate.
Now we’ll move on to the outdoor unit. Like the indoor unit, you’ll want to pick your location carefully. The outdoor AC unit will need space to “breathe,” so make sure all surrounding plants and shrubbery are trimmed back at least 2 feet. Once you’ve got a location, lay a concrete pad down. Make sure the pad is level before moving on to the next step.
Connect the wires from the indoor unit to the outdoor unit. Secure the piping using the outdoor unit’s flare nuts.
This final part will require the aid of a professional. It isn’t about whether or not you can do this next part yourself, but rather about the law. To run, your AC system will need refrigerant. Due to the law, refrigerant can only be handled by qualified people, i.e. heating and cooling specialists. Give them a call and have them come over and double-check all your connections and setup. If they give you the thumbs up, you’re almost done!
Once they’ve filled the system with refrigerant, you’ll want to bleed out any captured air and humidity from the refrigerant circuit. From there, wrap your outdoor piping in heavy insulation for protection, fasten the piping to the outdoor wall by using clamps, and seal up the remaining hole in the wall by sing expanding polyurethane foam.
With those last touches, your AC system should now be fully functional! If for some strange reason it’s not or you’re experiencing problems with it, take a look at the following troubleshooting guide by clicking here.
HVAC and Ductwork - an Overview
As human beings, we are comfort creatures. We crave familiarity and luxury in the most primitive of forms: heating and cooling. When it comes to your home, heating and cooling are vital parts of leading a life of comfort. However, in addition to proper heating and cooling, ventilation is also necessary to allow us to breathe in clean and filtered air. While ventilation may seem like an unnecessary addition to your central air system, in reality, proper ventilation can help reduce illness, spread of disease, and respiratory problems such as allergies and asthma attacks.
Collectively, the above is known as HVAC or heating, ventilation, and air conditioning. While HVAC by itself is important, it would not be possible without ducts to transport that air into and out of your home, furnace, humidifier, or other HVAC-related equipment.
Ducts are important pieces of HVAC, as they connect and seamlessly allow the flow of clean air, warmed or cooled, into your home. These types of ducts are made of many different types of materials based on what they’ll be used for. The most common type of material used for the basic metal duct is galvanized steel. This type of steel is standard and used because of its flexibility, durability, heating point, and malleability. To learn a little bit more about the different types of ducts, I’ve made a short list of the other basic types of materials used to make ducts and what they’re used for:
- Polyurethane and Phenolic Insulation Panels – used to pre-insulated air ducts
- Fiberglass duct board – used for pre-insulate non-metallic ductwork
- Flexible ducts (also known as flex) – used for attaching supply air outlets to firm ductwork
- Fabric ducts – used to more effectively provide air to a space than a normal exposed duct system
While ducts in themselves provide an air transport system, they too can get dirty. According to the US Environmental Protection Agency, ducts don’t need to be cleaned much, if ever. If you see any of the following going on around your home, it’s a red flag that your ducts may need to be cleaned out soon: excess dust on furniture, leftover dust that remains even after thoroughly cleaning, dusting, and sweeping, you experience nasal headaches, headaches, sinus problems, difficulty breathing, constant illness, increased allergies, respiratory problems, or nasal congestion, or you notice a stale or musty odor every time you turn on your central cooling or heating.
If you’re not sure if it’s your ductwork after experiencing one or more of the above symptoms, peek into your ductwork. Do you notice a musty odor or see any mold growing? Do you see huge deposits of dust? If yes, it’s time for your ducts to be cleaned out!
If you’re interested in learning more about ducts or interested in purchasing ducts for your home, click here to be redirected to plumbersstock.com, a trusty online plumbing source.